
1A.1 AIRPortal Document Manager User Guide for Design Consultants
1A.1.1 Introduction
The Maryland Department of Transportation Maryland Aviation Administration (MDOT MAA) Office of Engineering & Construction requires consultants to submit design documents to MDOT MAA via the AIRPortal Document Manager (ADM) application.
ADM is a light weight, downloadable, Windows-based desktop application that allows consultants to directly submit electronic deliverables to MDOT MAA for archiving in AIRPortal prior to the closeout of a project. The purpose of ADM is to streamline the archiving process and to ensure those documents meet archiving standards.
Final documents must be uploaded in PDF format. Consultants may submit files in other file formats in addition to PDF. Once design documents have been submitted and approved by the MDOT MAA archivist, they are stored in a database and are accessible by reference in the Engineering Records document library found in AIRPortal.
1A.1.2 System Requirements
To use ADM on a Windows PC, users must have at least the following:
· Windows 7 SP1 or higher
· .NET Framework 4.5 (Install will download it from Microsoft if target PC does not already have it installed)
· 1 GHz processor
· 1 GB RAM
· 100 MB of disk space
· Internet connectivity
For users of Internet Explorer, ensure that compatibility mode is turned off. To do this, go to Tools > Compatibility View Settings. Uncheck the box next to Display intranet sites in Compatibility View.
1A.1.3 Accessing AIRPortal Document Manager
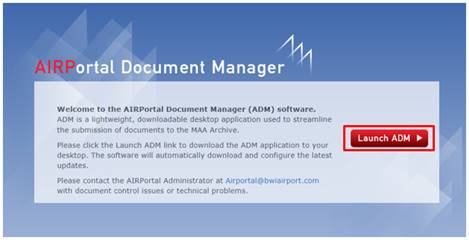
ADM software is available at the following AIRPortal location: AIRPortal>AIRPortal Document Manager (ADM). An AIRPortal login is required to access the ADM software. Additional permissions are required to use the software. To request permission to use ADM, the consultant project manager should contact the AIRPortal Administrator (airportal@bwiairport.com).
1A.1.3.1 Downloading AIRPortal Document Manager
When you click on the ADM module, you will be redirected to the download site. When you click the Launch ADM link, the software will download and install on the target PC. If the target PC does not have .NET framework 4.5, the framework will download with the ADM software.
1A.1.3.2 Installing AIRPortal Document Manager
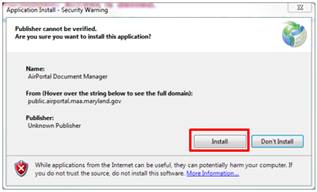
Once you have downloaded the AIRPortal Document Manager, click Install and follow the installation steps.
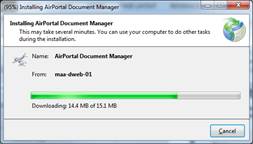
After you have clicked the Install button you will see the application being installed.
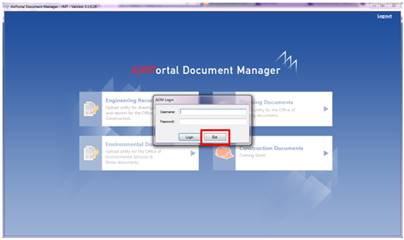
When the installation is complete, the AIRPortal Document Manager application will open. To close this window, click the Exit button at the bottom of the Login window.
1A.1.3.3 Opening AIRPortal Document Manager
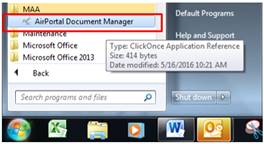
Once ADM is installed, the application will be available through Start Button > All Programs > MAA > AIRPortal Document Manager.
The application will automatically check for updates each time it is launched. Users are encouraged to install any updates to the software as they are available to ensure maximum functionality. To accept the application update, click OK.

1A.1.3.4 Logging Into AIRPortal Document Manager
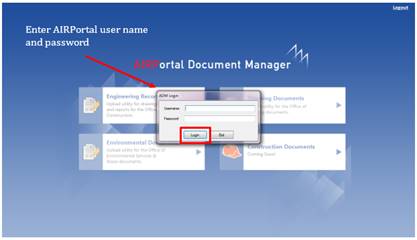
To log in to the AIRPortal Document Manager (ADM), enter your AIRPortal Username and Password in the ADM Login window. Click Login.
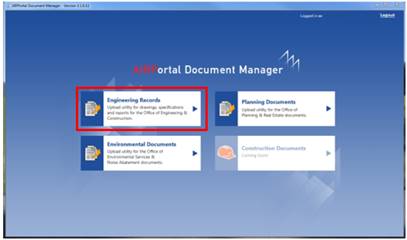
Once logged in, the user will come to a landing page where they can choose between Engineering Records, Planning Documents, and Environmental Documents. Permission to access these upload tools is dependent on the consultant. If a consultant does not have permissions to upload planning documents, the Engineering Records button will be grayed out. Click on the Engineering Records button.
1A.1.4 Engineering Records
Once logged in to Engineering Records within ADM, the user will see the list of AE contracts available to his/her login on the ADM home window. Permissions to view contracts are based on PIMS assignments.
1A.1.5 Overview of ADM Home Window
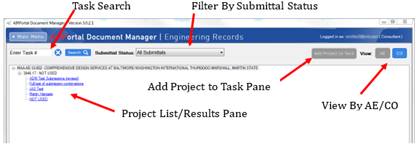
The ADM interface allows the user to search for a project, add a project to a task if it doesn’t already exist, and view the project list by AE number or by CO number.
Task Search Field: The Task Search Field allows the user can enter a specific Task number to search. Once the user enters a Task number, click the Search button to return results in the Project List/Results Pane.
Filter by Submittal Status: The user can also filter the Project List by selecting a specific Submittal Status out of the drop-down menu. The Project List/Results Pane will be updated to show only the projects that have submittals with that specific status.
Project List/Results Pane: The Project List/Results Pane is setup in a tree style. The user can navigate through a project by expanding the tree levels below the AE contract number. Projects will appear as hyperlinks in the tree.
Add Project to Task: Add Project to Task is greyed out unless a task is selected in the tree. The button is not available at the Contract level of the tree structure.
View By AE/CO: allows the user to toggle between the AE contract list and the CO contract list. The AE Contract list is filtered based on PIMS assignments for the design consultant or the MAA Task Manager. The CO contract list is a list of all COs and is not filtered.
1A.1.5.1 Overview of Document Submission Window
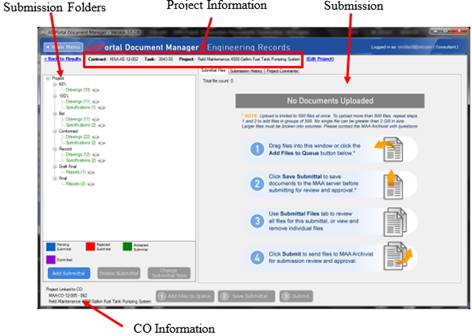
Once a project hyperlink has been clicked, the document submission window opens.
The information for the selected project is listed at the top of the window. This includes the AE Contract number, the AE Task number, and Project name.
The window is divided into two panes. The pane on the left is the folder structure for the submissions and the pane on the right is the submission area.
The information displayed in the submission area is controlled by tabs that allow the user to submit documents, review the submittal history and view any project comments entered by the MAA Archivist.
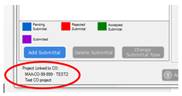
If a task has been linked to a CO number that information shows in the bottom left hand corner of the window.
1A.1.5.2 Submittal Files Tab
The Submittal Files tab allows the user to drag and drop files or navigate to files to build submission. Before any files have been loaded, instructions will appear in the Submittal Files tab.
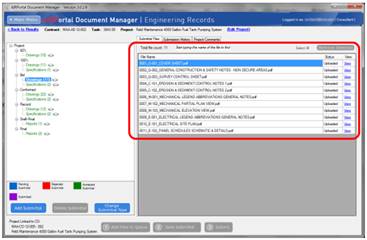
Once files have been added to a submission, the listing and status of files will appear in the Submittal Files tab.
1A.1.5.3 Submission History Tab
The Submission History tab shows the database transaction log for documents and submissions that have been saved, submitted, removed, changed type, rejected, or accepted.
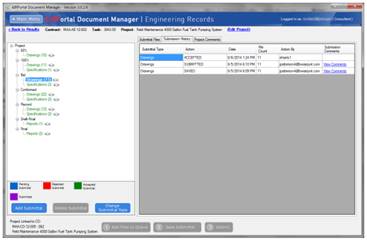
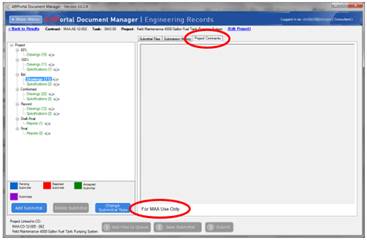
1A.1.5.4 Project Comments Tab
The Project Comments tab displays notes entered by the MAA Archivist related to the contract. This area is read only for every user except the MAA Archivist.
1A.1.6 Navigating to a Project
Before interacting with any submittal, the user must first navigate to a project. There are several ways to accomplish this.
1A.1.6.1 Browse to a Project
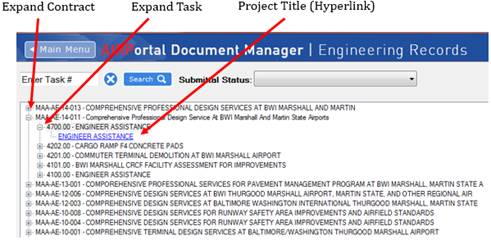
The user can browse to a project by expanding the tree levels below the AE contract number. The tree expands or closes by clicking the + and – signs next to each level.
Projects will appear as hyperlinks in the tree.
1. Expand a Contract (i.e. MAA-AE-14-011)
2. Expand a Task (i.e. 4700.00 ENGINEER ASSISTANCE)
3. Click the Project Title (i.e. ENGINEER ASSISTANCE). The Project Title is a hyperlink that when clicked, will open the submittal window.
1A.1.6.2 Search on a Task
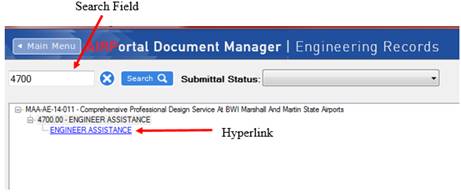
Alternately, users can search on a specific task number instead of browsing.
1. Enter a Task number in the Search field (i.e. 4700) and click Search.
2. The AE Contract the task is associated with will appear in the Project List/Results Pane.
3. Click the Project Title (i.e. ENGINEER ASSISTANCE). The Project Title is a hyperlink that when clicked, will open the submittal window.
1A.1.6.3 Filter by Submittal Status
If documents have already been submitted, or if a submission has been started and saved, the user can navigate using the Submission Status drop down.
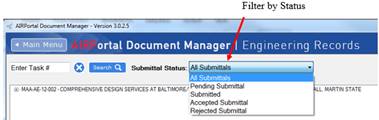
1. All Submittals – list of tasks and projects that has had or is in the process of having at least one (1) submittal.
2. Pending Submittal – lists only those tasks and project in process of building a submittal. Submittal has not been submitted to MAA.
3. Submitted – lists only projects that have been submitted to MAA but have not yet been reviewed by the Archivist.
4. Accepted Submittal – list of projects submitted and accepted by the MAA Archive. No additional work required.
5. Rejected Submittal – list of projects that have been submitted to the Archive but were rejected for not meeting submittal requirements outlined in the MAA Design Standards. Consultant must correct and resubmit the documents identified in the return email provided by the Archivist.
1A.1.6.4 Add Project to Task
The Add Project to Task button is used when a project is not listed in the tree structure but is occurring under a specific task.
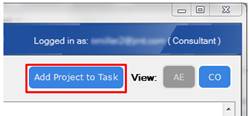
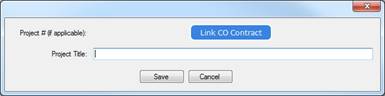
This usually occurs when a smaller, possibly unrelated assignment is added to an existing task (may have urgent/emergency need). This window allows the user to enter multiple Project Titles/descriptions under one (1) AE Task number and if appropriate, link the project to a CO Contract.
1A.1.6.5 Preparing a Submittal for Documents
Once the user has navigated to the specific project, documents can be uploaded for submission.
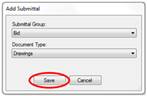
1. Select the Add Submittal button in the lower left-hand corner and the Add Submittal window will pop-up. This step will allow the user to build the folder structure for the submittal being made.
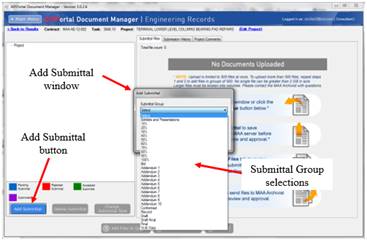
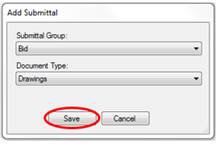
2. Select the following from the Add Submittal pop up:
a) Submittal Group - creates a folder to store the submissions.
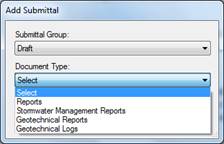
b) Document Type - creates a folder based on the type of document to be submitted. The options presented will be dependent upon the Submittal Group that was chosen previously. For example, if Draft was selected for the Submittal Group, the follow Document Types are available:
3. Once the Submittal Group and Document Type have been selected, click Save and the folders for Submittal Group and Document Type will be added to the left-hand side of the ADM window.
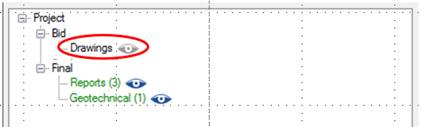
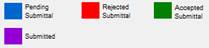
Document Types are color coded based on the follow legend:
If the Document Type is black, that means no documents have been loaded into the folder.
1A.1.7 Uploading Documents for a Submittal

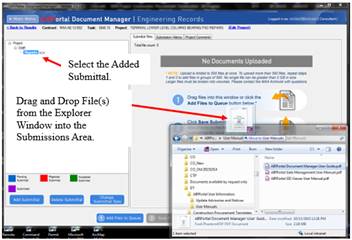
At this point the user will see the submittal folder has been established on the left-hand side of the ADM window. The next step is to upload documents to the project. There are two ways a user can upload the document(s) either by the drag and drop method and/or by clicking the Add File to Queue button at the bottom of the window.
1A.1.7.1 Uploading Document(s) by Drag and Drop
To add files by drag and drop, the user will have both the ADM and Explorer Windows open on the screen. The user will select the file(s) to be submitted in the Explorer window, then while holding down the left mouse button, will drag the selected file(s) to the submission area and release the left mouse button.
1A.1.7.2 Uploading Document(s) by Adding Files to Queue
The same thing can be accomplished by clicking the Add Files to Queue button at the bottom of the window.
1. Click the Add Files to Queue button and use the Explorer window to navigate to the files to be uploaded
2. Select the file(s) to upload
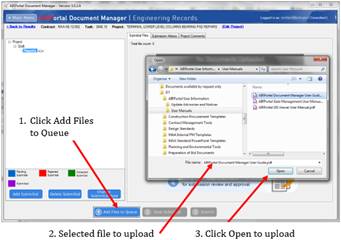
3. Click Open to upload selected file(s)
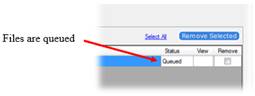
At this point the Submittal Files tab will be populated with the uploaded documents and the status will read Queued. You cannot View files through ADM that are only in the queue.
Once the files have been successfully queued, the user will click Save Submittal. This will move the files from the user’s local PC to the MAA Server. The Status will change to Uploaded.

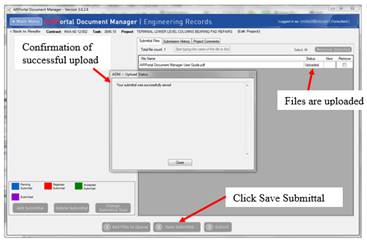
Depending on the number and size of documents in the queue, the upload process may take a few moments to complete. BE PATIENT … do not move on to another step until the Upload Status window is displayed.
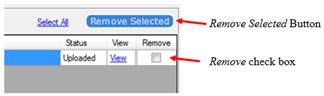
The user can remove a file by checking the Remove check box and clicking the Remove Selected button on the top right-hand side. These transactions are saved in the Submission History Tab.
The submittal is now saved and has been assigned Pending Submittal status.
1A.1.7.4 Changing a Submittal Type
The submittal group or document type can be modified prior to the information being submitted to the MAA Archive.
1. Highlight the folder to be corrected in the folder structure pane.
2. Click on the Change Submittal Type button at the bottom of the folder structure pane. This will cause the Submittal Type window to open
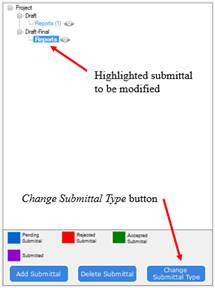
3. Correct the submittal information using the dropdown menus. When complete, click Save to record the change.
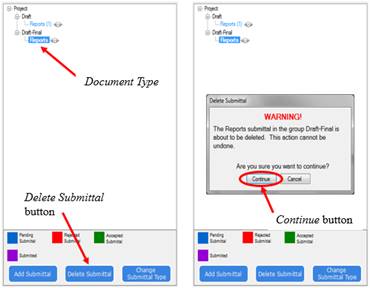
1A.1.7.5 Remove a Submission
The submitter can delete a submittal while it is in Pending Status (colored blue). This status means that files have been uploaded to the MAA server, but that they have not been transmitted to the MAA Archivist.
1. Click the Document Type you will like to remove.
2. Select and remove all files associated with the submittal to be deleted. This will activate the Delete Submittal button.
3. Click the Delete Submittal button.
4. The user will see the Delete Submittal pop-up window, click Continue to finalize the deletion.
1A.1.8 Submittal Documents to the MAA Archive
Once the submittal has been built and all documents have all been queued and saved, Submit button at the bottom will activate. Click the button and the document(s) will be submitted to the MAA Archive.
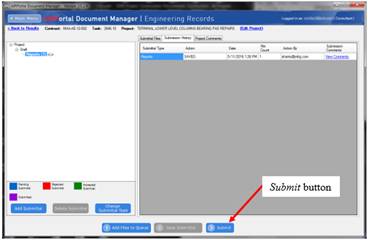
Click Submit and the Confirm Submittal pop up appears.
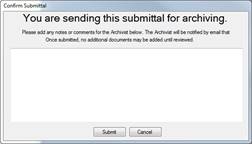
The submitter can make notes or comments in this pop up to accompany the submission. These notes will be viewed only by the MAA Archivist. The notes and comments are optional.
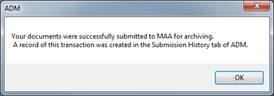
When Submit is clicked in the Confirm Submittal window, the MAA Archivist will be notified via email of the submission. A confirmation appears, and the submitter will see the submission turn purple in the Submission Area to indicate the documents have been submitted.
1A.1.8.1 Files Submitted to the MAA Archive
Once the Submittal has been sent to the MAA Archivist for review, the MAA Archivist will either Reject or Accept the submission.
If the submitted documents meet the criteria for acceptance as outlined in the MAA Design Standards, an automated email will be provided acknowledging the acceptance.
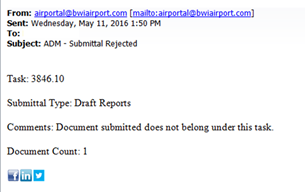
If the MAA Archivist rejects the submittal the user that submitted the documents will receive the following correspondence via email. The MAA Archivist will include comments that explain the reason for rejection.
1A.1.8.2 Resubmittal After Rejection by the MAA Archivist
If a submittal is rejected, the user will have the ability to correct and resubmit the documents. The user can review the comments from the MAA Archivist by clicking the View Comments hyperlink on the Submission History tab. These comments are the same comments as shown in the rejection notice via email.
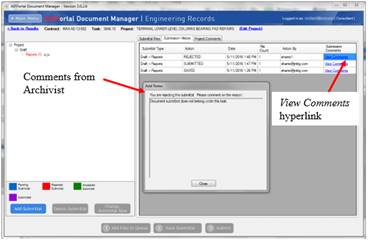
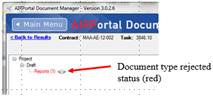
The user will see that the Document Type has turned red, indicating the rejection status.
1A.1.8.3 Making Corrections and Resubmitting
To correct a submission that has been rejected by the MAA Archivist, the user will follow the steps to remove the document or documents that failed, make corrections, and follow the steps to make a submission.
1A.1.8.4 Link a CO to a Project (Edit Project)
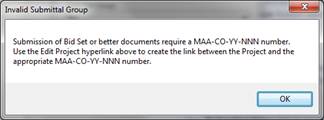
When making a submission of BID set or better, the project must be linked to a CO number. The ADM Application will not allow the submission of any files BID or better without this assignment.
1. To link a CO to a project, click the Edit Project link at the top of the ADM window.
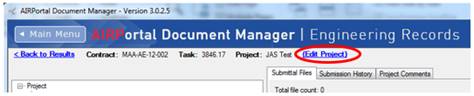
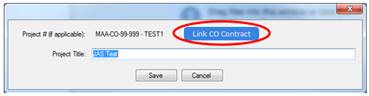
A window will open that allows the user to modify the Project Title as well as Link to a CO Contract.
2. Click the Link CO Contract button to open the Select CO Contract to Link window to search for a CO. This can be for regular contracts or project assigned to a comprehensive task.
3. To find your CO number fill-in the search box located at the top of the Select CO Contract to Link window and click search.
a. If your contract has been entered in the database, the related information will be displayed beneath the search box.
b. If you’re looking for a comprehensive task assignment, they will be listed in the box at the bottom of the window. Click on the appropriate task listing to select.
c. If your contract information is not listed, you’ll need to add the contract info to the database. (Follow the direction provided under Creating and Managing CO Contracts)
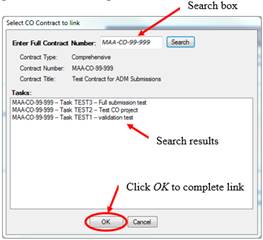
4. If your contract information is available, make sure it’s selected and click OK to create the link between the AE Task Number and the CO Contract. This information will appear in the bottom left hand corner of the ADM window.
1A.1.8.5 Creating and Managing CO Contracts
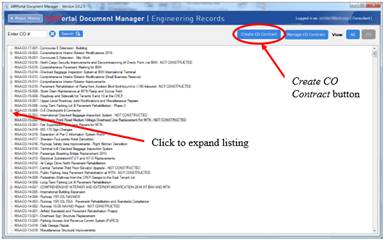
To create a link to a CO contract or CO Task, the contract must exist in the contract list. To create a CO or add a CO Task, the user can click on the View By: CO button on the ADM home window.

This will return a list of all available CO contracts. Clicking on the ‘+’ symbol next to a contract number will expand the list to display CO Task numbers.
If a CO contract is not listed, the user can click the Create CO Contract button at the top of the window and the Create new CO Contract window will appear.
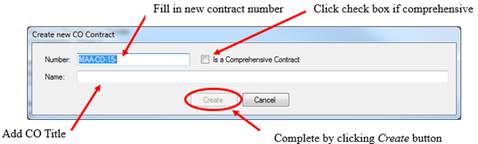
In the Create new CO Contract window, the user can:
· type in the CO Number
· type in the CO Name
· define the contract type (toggle between standard and comprehensive construction contract)
· click the Create button to complete the process
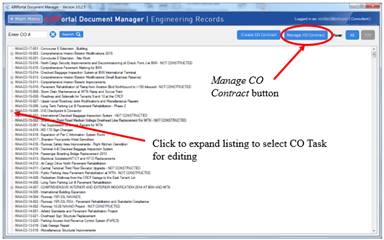
If the CO already exists, the information can be adjusted by clicking the Manage CO Contract button at the top of the window. The CO Number, Title and type can be altered in the Edit CO Contract window.
In the Edit CO Contract window, the user can:
· modify the CO Number
· modify the CO Name
· modify the contract type (toggle between standard and comprehensive construction contract)
· click the Update button to save modified information
· click the Delete button to remove the selected contract

To add a CO Task reference, select a Comprehensive Contract from the list of contracts and click on the Manage CO Contract button as noted above. Since the project is already identified as a Comprehensive Contract, the Edit CO Contract window and additional button Add Task becomes active.
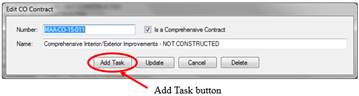
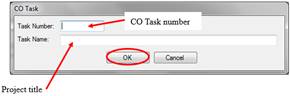
Click the Add Task button to access the CO Task window.
Fill in the CO Task number (three digits: 001, 002, 003, etc.) and the project title as noted on the Title page of the drawing set. To complete, click the OK button
If documents are being prepared for a Submittal Group that is BID set of better, the AE Task must be linked to a CO number. Documents cannot be added to the submittal if there is no CO link.

To link a project to a CO, follow the steps found under Link a CO to a Project (Edit Project).
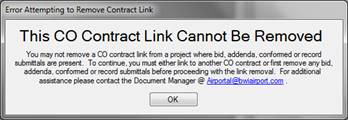
Conversely, if BID or better documents have been prepared for submission and have a CO link established, that link cannot be removed unless the documents are first removed. If the user attempted to remove the CO link prior to removing the documents from the submission, the following message will display:
The steps to remove files from a submission are found in Removing a file.
1A.1.8.6 Engineering Records ADM Best Practices
1. Allow ADM to install any updates to the software for maximum functionality.
a. If you can’t install the software on your PC, check with your IT group regarding software policies prior to contacting MAA AIRPortal Support.
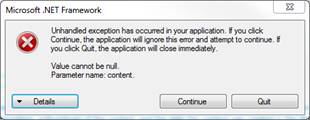
2. ADM must maintain internet connectivity. If connectivity is lost, an error message will appear:
3. Save files to your local hard drive prior to upload. This will facilitate a faster file transfer with fewer upload issues.
4. Remember there are upload limitations:
a. No more than 500 files can be saved at one time. If your submittal contains more than 500 files, add and save files in groups of 500 until all your files are loaded.
b. Any one single file cannot be greater than 2 GB in size.
5. Saving the Submittal is the step that transfers the files from the user’s PC to the MAA Server. This step is critical. Navigating off the submittal group or document type before saving will remove files from the queue.
6. Any documents being prepared for submission as BID set of better must have a CO link established prior to upload. If an upload of BID or better without establishing a link between the AE Task and a CO project a warning message is displayed:
a. Conversely, any submittal containing BID set or better documents, cannot be unlinked from a CO. If BID or better documents exist for a project and an attempt to remove a link is made, a warning message is displayed:
7. Submittals that have been accepted cannot be removed. Only those that have either a Rejected Submittal or a Pending Submittal status can be removed.
8. Planning for future drawings in a submission set is permitted provided the following rules are applied”
a. Submission of Review Drawing Sets (30/60/100% submittals) should be complete based on current available documents. If there are “planned” drawings identified in the Index of Drawings that are not submitted with the set, the consultants should gray out the index entry and that sheet should not be included in the sequence numbering of the set submitted.
b. In the example below the consultant expects to submit sheet G.009 in a future submission, while showing the intent in the index is appropriate, accounting for in the sequence is not. In this case, 17 pdf files were submitted with the sequence numbers in order 0001 through 0017.
